Live CDs
Live CDs are a bit old fashioned these days, but they often become necessary when working on older hardware that cannot boot from a USB. They are also super, SUPER cheap. A single burnable cd or dvd basically costs pennies.
So what are the options for burning a Live CD/DVD?
Windows Disk Image Burner (Windows only... duh...)
This is a great option for anyone running Windows 7 or better. I use this option on a regular basis and don't really see a need for another tool on Windows.
So how do you use it?
First explore to the (.iso) file and right click to bring up the context menu.
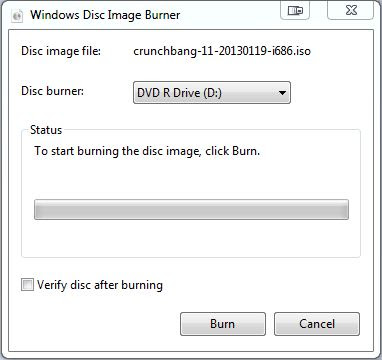
Choose to open the (.iso) with Windows Disc Image Burner...
Now pop a disc into the drive that you want to use for burning and select it from the drop down list.
Hit burn.
Wait.
Thats it, when you boot from the newly created disc, everything will work perfectly.
Mac OSX Disk Utility
For all you apple fanboys out there, you can burn a disk from within your OS without a special tool as well.
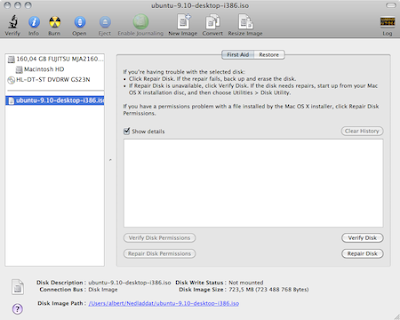
Launch your disk utility from the utilities menu. Then pop in a blank disk and drag&drop your (.iso) file into the left pane of the disk utility.
Select the (.iso) file and hit burn.
Wait.
DONE! Boom! Two operating systems down...
Brasero Disk Burner (Ubuntu, and other debian based distros)
Finally, there is no lack of disk burning options in Linux, but the Brasero disk burning tool is probably the most well known due to its integration in Ubuntu. The tools may be preinstalled on your OS, or available in the software center. If you don't see it there, you can always add it from the synaptic package manager.
Like before, you can probably just use the right click context menu to burn your (.iso) to a disc. If you don't have this option available, just open up the Brasero disk burner and select burn image (.iso) to disk.
Select the target disk that you want to burn the image to. Then surprise, surprise... hit burn...
AAAAAAND wait.
Done... blah blah blah... that is good enough for burning live cd/dvds.
Now its time for the good stuff... bootable USB drives!!!! Yeah!
Live USBs
Time to look at the most useful form of bootable media. I suggest buying yourself a nice 32gb flash drive and carrying it with you as part of your EDC kit. Load that bitch up with operating systems, boot diagnostic tools, password recovery tools, you name it!
Unetbootin (Windows, Linux, Mac)
Unetbootin is probably the most well known bootable USB creator. It is a powerful tool that you should be familiar with.
Unetbootin will automatically download the image file you want to use, but that can be painfully slow. Instead I suggest just downloading the image yourself and using the disk image option.
The only confusing part of the process is that no one tells you to format your USB drive to Fat32... so be sure to do that before attempting to make a bootable USB... otherwise it just wont boot...
Select the image and the USB drive (formatted to Fat32) then click okay.
Wait until the unpacking process is done, and you are all set to go!
As a special bonus, you can select a portion of the disk to be a storage partition. By giving the OS room here, you will make any changes persistent. Not all operating systems support this feature. If you don't know what this means, I'll explain it. When you boot into a Live CD/USB the entire OS loads into memory and runs just like it was installed to your hard drive. But since it isn't actually installed, when you turn the computer off you can just pop out the disk and take the full OS with you. Leaving the computer totally untouched. You can also use the Live CD/USB to install the OS onto an HDD if you so choose. If you are just carrying around an OS in your pocket for personal use, you might want to give it some space to save files and settings in. That way all of your work isn't deleted when the computer turns off.
YUMI (Windows)
Now lets talk about my favorite Multiboot USB tool!
YUMI is very nearly the same program as Unetbootin, just looking at the screenshot will tell you how similar they are. After reading the rest of this post, YUMI is going to be a breeze... you probably don't even need me to explain it! But I'm still going to...
The first thing you want to recognize is that YUMI does not automatically download images for you. It does provide the download link to nearly all of the images it supports, but you need to manually download images. The second thing you need to realize is that you should install 7zip so that YUMI can unpack (.iso) files. I'm sure that it will work with some other Zip programs, but I know for sure that 7zip is super cool and basically you should install it anyways because I said so.
There are a lot more options here than there were in Unetbotin, so lets go over how to add a few images to a multiboot USB stick.
First, find a suitably sized USB drive. I carry a cheap 32gb drive I got from the UCSD bookstore for $15. It holds pretty much all of the images I could possibly want.
Next you want to look through the list of Images and Linux distros available in the YUMI list. There are a lot of them, and you might find one or two that you have never heard of! The list in Yumi is broken down the same way that the boot menu will appear. (ie. if you have netbook images, they will be under netbook images in the boot menu). Now go ahead and download all of the images you want to add to the disk. You can add more later too, but it's nice to try adding at least two for your first try.
Now select your USB drive from the dropdown menu and check the Format Drive button if this is your first time running YUMI on this USB.
Select the first OS you want to add from the list and browse to the (.iso) that you downloaded.
Persistence is not really supported because of the confusion it would create across multiple operating systems. There is a workaround, but I am not going to go into that right now.
Hit create and wait for YUMI to format, install the bootloader, and finally unpack the (.iso) onto your USB.
You will be asked if you want to add another image when the first one is complete. You can select another image file and add it if you like (dont format... duh... that would erase your USB drive), then when you are done just close YUMI. Make sure to eject the USB safely and try it out by rebooting and booting from the USB.
This is the type of menu that will appear, depending on the images you have installed. You can select any one of them to boot into Live, or start the installer function.
It is pretty great, and there are a multitude of images supported!
That's pretty much all you need to know about making Live CDs and USBs.
Good luck and have fun!
Also, checkout Writing a (.img) file to a USB in Windows


REALLY ? There i snothing here about remastering the iso image that you so cheerfully burn to the disc.
ReplyDeleteOn a post for absolute beginners who do not know how to burn an iso, yes there is nothing here about remastering operating system images. That would be an entire post on its own.
DeleteBeyond that, remastering is not always ideal. For the majority of installs, an OS is going to be best in its vanilla flavor. For the less than likely instances where a remastered image is desirable, the user is often advanced enough to know how to accomplish the task without first asking how do I burn an iso?
Yes i have checked all the options and those are great. Those are so great content and i bookmarked them.
ReplyDelete